
Currently, I am moving my in-house lab to my garage. I installed a cabinet in the garage, bought a new Ubiquiti 24 ports switch which functions as a layer 2 switch inside of the cabinet.
My Synology is now connected to a LAG interface on my 16 Ports Layer 3 switch. Since I’m planning to move all of my hardware to my cabinet in the garage I also need to move the Synology, connect it to the UniFi switch and create a LAG again.
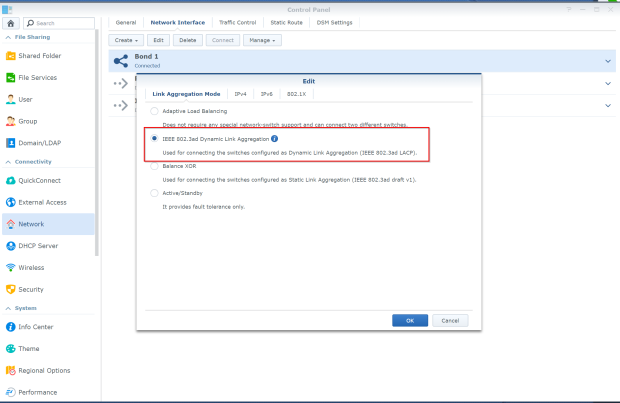
Initially, the Synology Bond need to be prepared for LACP (IEE 802.3ad). This can be done via Control Panel – Network – Network Interface – Bonded Interface (if already created, otherwise you need to create one). Select IEEE 802.3ad Dynamic Link Aggregation for the Bond interface and apply the configuration.
Because the switch is not prepared yet, the Synology will provide an error message which states that the LACP LAG cannot be created. No worries, this will be fixed automagically after the UniFi switch has been properly configured.
The next step is enabling the 2 switch ports where the Synology is connected for LACP. Login to the Unifi SDN controller, go to your device (switch) and open the ‘port configuration’ for the switch.
- Choose Aggregate as the operation mode
- Define the ports that need to be aggregated (only need to be set on the first port)
- Apply the config

With these settings, the UniFi switch has been enabled for LACP for the defined ports. And the LACP enabled Synology bond will recognize that and apply it for the Synology as well.
If you have any questions or remarks, please let me know!

which model of ubiquiti switch do you have? I’m looking for one that supports LACP.
LikeLike
It’s the ‘Switch 24’ model
LikeLike
Worked like a charm…..thanks for posting this!!
LikeLike
Thanks for posting this quick guide. Nice that the process is straight forward on both the Synology and Ubiquiti sides, but for Synology, I had assumed (never a good thing. I did notice LAN1 and LAN2, but it was around 3:30 am of a reracking project) that it was LAG was enabled by default… Working through the Ubiquiti app today was a little bit different than the nice single-page graphic in the post, but I managed to muddle through it. I’ll check out some more of your posts!
LikeLike
Nice guide; In addition to this, if you have installed a cloudkey in a docker on your NAS do it in below order.
1. Connect your NAS to a free port on the switch that will not be part of the aggregrated ports.
2. Configure the bond on your Unifi switch and save your settings.
3. Create the bond on your Synology NAS and wait a few moments.
4. Unplug the NAS from the switch.
5. Insert the cables from your NAS into the defined ports.
If you manage to mess it up like I did,
6. Hold the reset button on the NAS a few seconds until you hear a beep.
7. Enter find.synology.com in your browser
8. Log in using “admin” and a blank password (no password)
9. Reset the admin password
10. Reconfigure the network settings
11. Try again from step 1
LikeLike
Nice guide; In addition to this, if you have installed a cloudkey in a docker on your NAS do it in below order.
1. Connect your NAS to a free port on the switch that will not be part of the aggregrated ports.
2. Configure the bond on your Unifi switch and save your settings.
3. Create the bond on your Synology NAS and wait a few moments.
4. Unplug the NAS from the switch.
5. Insert the cables from your NAS into the defined ports.
If you manage to cock it up like I did,
6. Hold the reset button on the NAS a few seconds until you hear a beep.
7. Enter find.synology.com in your browser
8. Log in using “admin” and a blank password (no password)
9. Reset the admin password
10. Reconfigure the network settings
11. Try again from step 1
LikeLike